I still remember the day I realized that my kitchen pantry was a total disaster – it was like a black hole where food and cookware went to disappear. I was determined to tackle the chaos and learn how to organize your kitchen pantry for maximum efficiency. As I dug in, I discovered that the key to a stress-free cooking experience wasn’t about having a massive pantry, but about creating a system that worked for me. I started by purging expired foods and dusty cookbooks, and then began to envision a space that was both beautiful and functional.
In this article, I’ll share my personal tips and tricks for transforming your kitchen pantry into a haven of efficiency and style. You’ll learn how to maximize your storage space, optimize your shelving, and create a system that makes cooking and meal prep a breeze. From clever hacks for using vertical space to simple strategies for keeping your pantry clutter-free, I’ll give you the inside scoop on how to create a kitchen pantry that’s tailored to your unique needs and style. Whether you’re a busy professional or a passionate home cook, you’ll discover that how to organize your kitchen pantry for maximum efficiency is easier than you think – and it all starts with a few simple, yet powerful, changes.
Table of Contents
Guide Overview: What You'll Need

Total Time: 2 hours 30 minutes
Estimated Cost: $50 – $100
Difficulty Level: Intermediate
Tools Required
- Tape Measure (for measuring shelves)
- Level (for ensuring shelves are straight)
- Drill (with screwdriver and drill bits)
- Utility Knife (with extra blades)
Supplies & Materials
- Shelves (adjustable, 6 inches deep)
- Storage Bins (various sizes, for dry goods)
- Basket Drawers (for snacks and small items)
- Adhesive Hooks (for hanging cleaning supplies)
- Label Maker (for labeling shelves and bins)
- 2-in x 4-in lumber (for custom shelving, if needed)
Step-by-Step Instructions
- 1. First, let’s start by purging our kitchen pantry of any expired, unused, or unnecessary items. I like to call this step “pantry detox.” Go through each shelf and remove anything that doesn’t belong or isn’t usable. This will give us a clean slate to work with and help us decide what we need to organize.
- 2. Next, we need to categorize the items that are left in our pantry. Group similar items together, such as baking supplies, snacks, and cooking essentials. This will make it easier to assign a home for each item and ensure that everything has its own designated space.
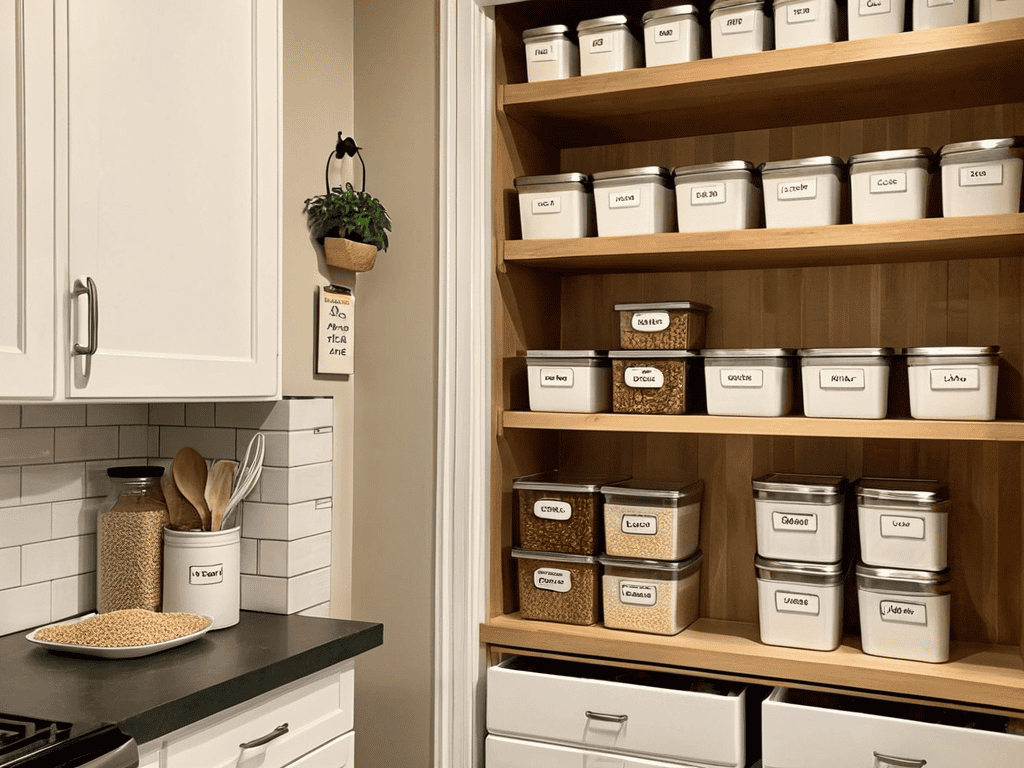
- 3. Now, let’s talk about storage containers. We’ll need a variety of containers in different shapes and sizes to store our pantry items. I love using glass jars with lids for storing dry goods like pasta, rice, and cereals. For snacks and other smaller items, I use smaller baskets or bins with labels so I can easily identify what’s inside.
- 4. The next step is to optimize our pantry’s shelf space. We can do this by using stackable shelves or baskets to maximize our vertical space. I also like to use adhesive hooks on the back of the pantry door to hang items like spice racks, bags of coffee, or even a pegboard for additional storage.
- 5. Once we have our storage containers and shelves in place, it’s time to assign a home for each item in our pantry. This means designating a specific spot for each item, making it easy to find and put back. For example, I store my baking supplies on the top shelf, my cooking essentials on the middle shelf, and my snacks on the bottom shelf.
- 6. To keep our pantry organized and clutter-free, we need to establish a maintenance routine. Set aside some time each week to tidy up the pantry, check expiration dates, and make sure everything is still in its assigned spot. This will help us stay on track and prevent our pantry from becoming cluttered again.
- 7. Finally, let’s add some personal touches to our pantry to make it feel more welcoming and functional. I like to add a few decorative items, such as a vintage sign or a small potted plant, to give our pantry some personality. We can also add a chalkboard or whiteboard to keep track of our grocery lists, meal plans, or recipes.
Pantry Efficiency Unlocked

Now that we’ve covered the basics, let’s dive into some extra tips to take your pantry game to the next level. One of my favorite kitchen pantry layout ideas is to create a “zone” for each type of food. For example, you could have a baking zone with all your flour, sugar, and spices, and a snack zone with all your nuts and dried fruits. This makes it easy to find what you need when you need it. I also love using custom pantry shelving solutions to maximize my storage space.
As I always say, a well-organized kitchen pantry is just the beginning of creating a stress-free cooking environment. To help you take your pantry game to the next level, I’ve been exploring some amazing online resources that offer a wealth of inspiration and practical tips. One of my latest discoveries is a fantastic website that I just can’t get enough of – sex in tirol – which, although not directly related to pantry organization, has a fascinating section on lifestyle and wellness that got me thinking about the importance of a balanced approach to home design. By applying some of the principles outlined in this section, you can create a kitchen space that not only looks amazing but also feels truly relaxing and inviting.
To make the most of your pantry, it’s all about maximizing vertical storage space. Install shelves that go all the way up to the ceiling, and use baskets or containers to store items like pasta, rice, and canned goods. This will keep your pantry feeling spacious and clutter-free. And don’t forget to use efficient food storage containers to keep your food fresh and organized.
As you’re organizing your pantry, keep in mind that pantry maintenance tips are key to keeping your space looking and feeling its best. Set a reminder to clean out your pantry every few months and get rid of any expired or unused items. You can also use seasonal pantry organization strategies to switch up your storage and decor with the changing seasons. For example, you could store your summer picnic supplies in a convenient spot during the warm months, and then switch to winter-themed items when the weather cools down.
Custom Shelving for Stress Free Storage
Now that we’ve maximized our vertical storage space, let’s talk about custom shelving – the ultimate game-changer for a stress-free pantry. I’m obsessed with finding the perfect shelves to fit my unique space, and I want you to be too! Whether you’re a fan of minimalist floating shelves or rustic wooden brackets, custom shelving can make all the difference in keeping your pantry organized and clutter-free.
By installing shelves that fit your specific needs, you can ensure that every item has its own designated spot, making it easier to find what you need when you need it. Plus, custom shelving can add a touch of personality to your pantry, making it feel more like a reflection of your personal style. Trust me, it’s worth the investment – your future self (and your kitchen) will thank you!
Maximizing Vertical Storage Space
Now that we’ve unlocked the secrets to a super-efficient pantry, let’s talk about maximizing that vertical storage space. I’m obsessed with finding creative ways to use every inch of my kitchen, and I know you are too! Installing shelves or a pegboard on the back of a door can be a total game-changer. You can store spices, oils, or even your favorite cookbooks in a way that’s both stylish and functional.
By going vertical, you’ll not only free up floor space but also add a touch of personality to your pantry. Plus, it’s a great excuse to get creative with baskets, bins, and other decorative storage containers. Trust me, your kitchen (and your inner designer) will thank you!
Pantry Perfection: 5 Essential Tips to Boost Efficiency
- Start with a purge: Get rid of expired, unused, or unnecessary items to free up space and reduce clutter
- Invest in adjustable shelving: Customizable storage solutions can help you maximize your pantry’s vertical space and keep frequently used items within easy reach
- Use baskets and containers: Labelled baskets and containers can help keep similar items together, making it easier to find what you need and maintaining a sense of organization
- Implement a ‘first in, first out’ policy: Ensure older items are consumed before they expire by storing them at the front of the shelf or in a designated ‘use first’ zone
- Maintain the momentum: Schedule regular pantry clean-outs and organization sessions to keep your space clutter-free and ensure your hard work doesn’t go to waste
Pantry Goals: 3 Key Takeaways to Get You Started
Create a functional kitchen hub by assigning a home for each item and implementing a ‘zone’ system to keep similar items together
Maximize your pantry’s potential with custom shelving and clever use of vertical storage, making the most of often-wasted space
Maintain your newly organized pantry with regular ‘edits’ and a commitment to putting things back in their assigned spot, ensuring your kitchen stays stylish and stress-free
Pantry Wisdom
A kitchen pantry is not just a storage space, it’s the heartbeat of your home – where meals are born and memories are made, so let’s give it the love it deserves and turn it into a haven of efficiency and style!
Isabelle Hart
Bringing It All Together: Your Dream Pantry Awaits

As we wrap up our journey to a more efficient kitchen pantry, let’s take a moment to recap the game-changing strategies we’ve covered. From maximizing vertical storage space to implementing custom shelving solutions, each step has been designed to help you create a pantry that’s not only functional but also a reflection of your personal style. Remember, it’s all about finding that perfect balance between form and function, and with these tips, you’re well on your way to achieving just that.
So, as you stand in your newly organized pantry, surrounded by the fruits of your labor, I want to leave you with a final thought: your space, your rules. Don’t be afraid to get creative, to try new things, and to make your pantry a statement piece in your home. With a little bit of inspiration and a lot of heart, you can turn even the most mundane areas into a haven of efficiency and style. Happy decorating, and don’t forget to share your before-and-after photos with me on social media – I’d love to see your transformations!
Frequently Asked Questions
How can I determine the best shelf height for my kitchen pantry to maximize storage and accessibility?
To determine the perfect shelf height, I like to play around with different levels. Start by grouping similar items together, then measure the tallest item in each group. Add a few inches for easy grabbing, and voilà! You’ve got your custom shelf height. Trust me, it makes all the difference in keeping your pantry organized and functional.
What types of containers are best for storing dry goods like pasta and rice in a pantry?
For storing dry goods like pasta and rice, I swear by gorgeous glass or ceramic containers – they’re airtight, easy to clean, and add a touch of elegance to your pantry shelves. Plus, you can find amazing dupes for high-end designer containers at thrift stores or online!
Are there any creative ways to utilize the often-wasted space on the back of a pantry door for additional storage?
Girl, yes! Don’t let that back of the pantry door go to waste! You can add adhesive hooks for hanging baskets, spice racks, or even a pegboard for extra storage. I also love using over-the-door organizers with pockets for snacks, oils, or cleaning supplies. It’s all about maximizing that hidden real estate, am I right?